
Your vision is one of your most precious senses, yet many people take it for granted—until problems arise. Whether you’re experiencing vision issues or simply keeping up with routine care, scheduling regular eye exams is essential for maintaining optimal eye health. If you’ve ever found yourself searching for an eye exam or a vision doctor near you, you’re already on the right path. But what actually happens during an eye exam? Let’s walk through the process step by step so you can feel confident and prepared for your next visit.
Step 1: Checking In and Patient History
Upon arrival at your optometrist’s office, you’ll start by providing basic personal information and filling out a medical history form. This step is crucial because many general health conditions—like diabetes, high blood pressure, or even autoimmune disorders—can impact your vision. Be ready to discuss:
⦁ Any current vision problems (blurriness, headaches, eye strain, etc.)
⦁ Past eye conditions or surgeries
⦁ Family history of eye diseases (glaucoma, cataracts, macular degeneration, etc.)
⦁ Medications you’re taking, as some can affect eye health
If you wear glasses or contact lenses, bring them along, as your optometrist will want to assess your current prescription.
Step 2: Pre-Exam Tests
Before you even sit in the exam chair, a technician may perform some preliminary tests to gather baseline data about your eyes. These tests can include:
Autorefractor Test
This machine estimates your prescription by analyzing how light reflects off your retina.
Eye Pressure Test (Tonometry)
A quick puff of air onto the eye measures intraocular pressure, screening for conditions like glaucoma.
Peripheral Vision Test
You’ll be asked to focus on a central object while lights flash in your peripheral vision, testing for blind spots.
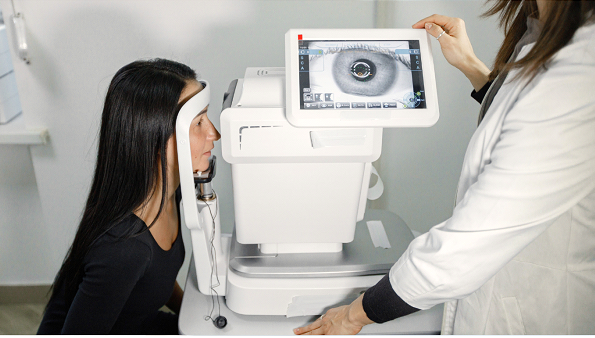
Retinal Image
This non-invasive photo captures detailed images of the back of your eye to help detect diseases and track changes over time.
OCT (Optical Coherence Tomography)
OCT is a cutting-edge imaging test that provides cross-sectional views of your retina, helping your optometrist identify early signs of diseases like glaucoma or macular degeneration.
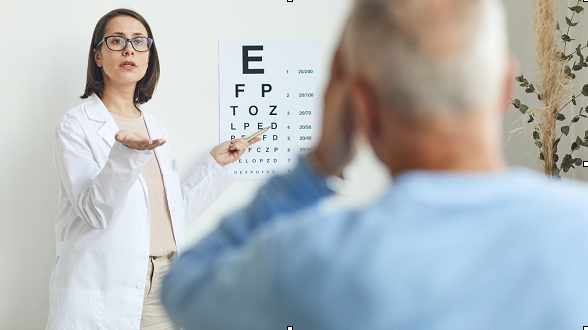
Step 3: Visual Acuity Test
This is the classic eye chart test! You’ll sit in a chair and read letters from a chart (usually a Snellen chart) placed at a distance. The letters start large and get progressively smaller, allowing your optometrist to assess how clearly you see at different distances.
If your vision isn’t 20/20, don’t worry! Many people need corrective lenses, and this test helps determine if you do too.
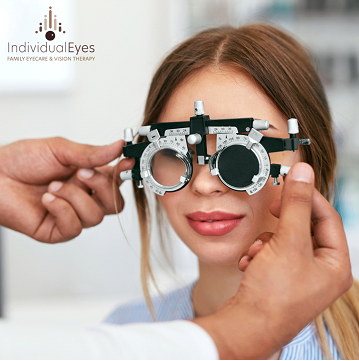
Step 4: Refraction Test (Determining Your Prescription)
Ever had your optometrist ask, “Which is better, one or two?” during an eye exam? That’s the refraction test! Using a phoropter—a device with different lenses—the optometrist fine-tunes your prescription for eyeglasses or contact lenses. By comparing different lenses, they determine the optimal correction for your nearsightedness, farsightedness, or astigmatism.
Step 5: Eye Movement and Alignment Test
Your vision doctor will check how well your eyes move and work together. This involves following a moving object, such as a pen or light, with your eyes. This test helps detect issues like strabismus (eye misalignment) or amblyopia (lazy eye), both of which can affect vision quality and depth perception.
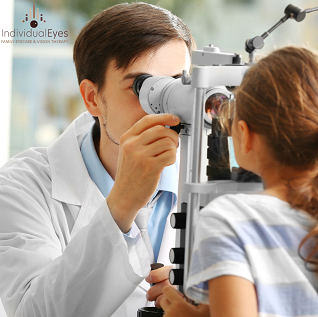
Step 6: Slit Lamp Examination (A Closer Look at Eye Structures)
A slit lamp is a specialized microscope that allows your optometrist to examine your eye structures in detail. Using a bright light and magnification, they can inspect your:
⦁ Cornea (the clear outer layer of your eye)
⦁ Lens (where cataracts can form)
⦁ Iris (the colored part of your eye)
⦁ Retina and optic nerve (important for detecting conditions like macular degeneration and glaucoma)
Sometimes, your doctor may use fluorescein dye drops to highlight abnormalities in the cornea or tear film.
Step 7: Retinal Exam (Dilation and Retinal Imaging)
To get a clear view of the retina and optic nerve, your doctor may dilate your pupils using special eye drops. While this makes your eyes more sensitive to light for a few hours, it allows the optometrist to check for signs of serious conditions such as:
⦁ Diabetic retinopathy
⦁ Macular degeneration
⦁ Retinal detachment
Some clinics offer advanced digital retinal imaging as an alternative to dilation. This technology captures detailed images of your retina, providing a permanent record that can be compared over time.
Step 8: Glaucoma Test (Ophthalmoscopy and Tonometry)
In addition to the eye pressure test performed earlier, your optometrist may use ophthalmoscopy to examine the optic nerve for signs of glaucoma. This involves shining a bright light into your eyes and using a magnifying device to inspect the nerve’s shape and color.
For high-risk patients, further testing like optical coherence tomography (OCT) may be recommended to measure the thickness of the nerve fibers.
Step 9: Discussing the Results and Next Steps
Once all tests are complete, your optometrist will discuss their findings with you. This conversation will cover:
⦁ Whether you need prescription glasses or contacts
⦁ Any detected eye health concerns and potential treatments
⦁ Tips for maintaining eye health (nutrition, screen time habits, UV protection, etc.)
⦁ The recommended frequency of future eye exams
If a serious issue is detected, your optometrist may refer you to an ophthalmologist (a medical doctor specializing in eye diseases) for further evaluation or treatment.
Bonus: Contact Lens Fitting (If Needed)
If you’re interested in contact lenses, an additional fitting may be performed. Your optometrist will:
⦁ Measure your cornea to ensure the right fit
⦁ Teach you how to insert, remove, and care for lenses
⦁ Provide trial lenses to see how they feel before ordering a full set
Why Regular Eye Exams Matter
Even if you have perfect vision, regular eye exams are crucial for early detection of potential problems. Many eye diseases develop silently, without noticeable symptoms until significant damage has occurred. That’s why experts recommend:
⦁ Children: First eye exam by age 1, again before school, then every 1–2 years
⦁ Adults under 40: Every 2 years (unless vision changes occur)
⦁ Adults 40+: Every 1–2 years due to higher risk of age-related conditions
⦁ Seniors 60+: Annual exams recommended
Finding an Eye Exam Near You
If you’re overdue for an eye checkup and it’s time to search for an eye exam or a vision doctor near you – Individual Eyes has got your back!
An eye exam is much more than just checking if you need glasses—it’s a comprehensive health assessment that can detect serious conditions before they become major issues. By understanding what to expect, you can approach your next visit with confidence, knowing you’re taking the right steps to protect your vision. So don’t wait—schedule your next eye exam today at Individual Eyes and keep the world in focus!